Portfolio Website
Building and deploying a portfolio website using Nuxt, TailwindCSS and Nuxt Content.Project Goals
In this project, I aimed to create a simple portfolio website (this one) for me to showcase my work.
I had a few requirements in mind for this:
- Minimalistic and responsive design
- Statically hosted
- Simple styling
- Dark mode (the most important feature)
Architecture
To start with, I needed to decide what I was going to use to build the site. I've worked with Nuxt.js and used Strapi as a backend CMS for a previous project, but I found Strapi to be a heavy and unwieldy product that doesn't do anything particularly hard. As I'm going to be the only person making edits to the site, I can use something that requires more technical knowledge and is simpler.
I decided on:
- Nuxt for the framework.
- Full stack framework for building SSR and SSG applications.
- Nuxt Content for content management.
- Much simpler than Strapi (opinion warning).
- Git based CMS, data is stored alongside code.
- Markdown based.
- Nuxt SEO for SEO utilities.
- Automatically generates OG images for link previews.
- Automatically handles sitemap generation.
- Automatically handles robots.txt generation.
- Nuxt Icon for icons.
- Nuxt Image for image optimization.
- Optimizes images and generates srcsets.
- TailwindCSS for styling.
- Utility based CSS framework.
- Cloudflare Pages for hosting.
- Free hosting for static sites, with a global CDN.
Project Structure
Styling
Styling is done using TailwindCSS, tailwind provides a series of extensible utility classes that can be applied to elements to style them.
This differs from a more traditional CSS framework like Bootstrap, which takes a component based approach.
In a component based framework, you style elements using a component class such as btn which then styles that component like a button.
With a utility based framework, you compose utility classes together to style an element.
Both approaches have their pros and cons.
- Component based:
- Pros:
- Simple to use, just add a class to an element.
- Easy to understand how an element will look.
- Cons:
- Limited styling options, you are limited to the components provided by the framework.
- Pros:
- Utility based:
- Pros:
- More flexible.
- Can compose utility classes together to create any style you want.
- Cons:
- Long class names on elements.
- Harder to figure out exactly how an element will appear.
- Pros:
I find the drawbacks of the utility based approach can be mitigated by taking a component based approach to building the site.
E.g. you can build an XButton component that uses utility classes for styling, but as it is encapsulated into a component it is easy to re-use across an application.
I designed a few components using tailwind to re-use throughout the site, this can be found on the dev pages deployed with this site.
Dark Mode
Dark mode is natively supported by TailwindCSS, and can be enabled by simply adding a dark (with some configuration) class to the body of the page.
I used the library vueuse to check the user's preferred color scheme and allow switching between light and dark mode.
They have a handy utility called useColorMode that handles this for you using local storage and media queries.
You just need to handle the addition and removal of the dark class on the body yourself, which I handled with a DarkModeSwitch component.
You can do this yourself instead of relying on an external library, all you need to do is check the user's preferred color scheme using the window.matchMedia API and store the preference in local storage.
Then you can add or remove the dark class on the body based on the stored preference.
Content
Nuxt Content allows you to configure multiple content sources, with different queryable fields. At runtime, each of these sources gets loaded into an SQLite database, which can then be queried from the application. This allows for easy filtering and sorting of content.
For this site, I have divided the content into the following collections. I will probably end up expanding this list in the future, but for now this is sufficient.
- Pages
- Projects
- Projects to showcase on the projects page (like this one).
- Socials
- Social links to show in the footer.
Pages
Nuxt uses file based routing, where the file structure of the pages directory is used to generate routes for the site.
The pages directory is very simple for now, with only 3 templates in use.
app/
└── pages/
    ├── projects/
    │   └── [slug].vue
    ├── [...path].vue
    └── dev.vue
dev.vue page is a development page used for testing components.
The [...path].vue page is a catch all that renders the matching page from the pages collection,
and the projects/[slug].vue page is used to render the matching project from the projects collection.
Deployment
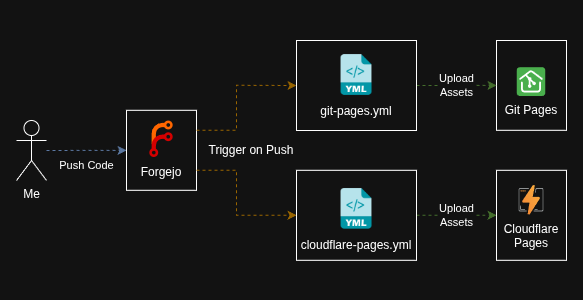 Diagram of deployment infrastructure
I host my code on my own self-hosted Forgejo instance, which has CI/CD support using Forgejo actions. When code is pushed to the repository, the site is built statically and then deployed to one of the following environments.
- Staging:
- Deployed to git pages.
- Open source equivalent to GitHub pages.
- Production:
- Deployed to Cloudflare Pages.
- Cloud hosted, so downtime on my server will not take the website down.
At the moment, these two environments are always updated together when I push to the repository. Long term, it would be better to have a separate staging branch or a manual trigger for production deployments. But for my purposes, this is good enough.
Conclusion
Well there you have it, some background information on how this site was built. You can check out the source code for this site here. More projects to come soon (hopefully)!
3bb7c66 at 4th Aug 2026 22:28:39